Incubating and hatching Marans eggs.
Incubating Marans eggs:
Marans eggs are not the easiest to hatch as the shell is so thick and waterproof, probably from their originally having been bred in a marshy area and needing to have extra strong waterproof eggs.
The eggshell when formed is white, but as it passes through the oviduct the brown pigment is applied layer by layer, with the darkest eggs having the most coats of pigment.
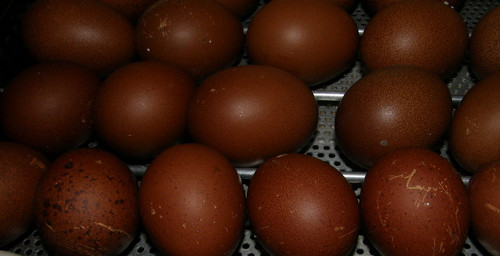
Below: Dark brown Marans eggs in the incubator.
Each coat of colour increases the thickness of the shell making it that much more difficult for oxygen to reach the developing embryo, and for sufficient room to build up to in the "air-sac" to allow the chick to move around when it is due to pip, and also making it more difficult for the chick to escape the shell.
Also those hens which lay the very darkest of the eggs can retain their egg so long in the oviduct that the embryo develops past a critical stage, and when the egg is finally laid it cannot stand the temperature shock, and will die and show as an infertile egg. Whereas in reality it was early death, the darkest of eggs are the most susceptible.
Do Marans eggs take longer to hatch?
From my incubation and hatching records it takes my Marans eggs and extra 14 hours to hatch, an average of 22 days to hatch and from my observations it can take the chick longer to exit the shell as well.
The shells often inhibit the evaporation of moisture from the egg and this can result in big chicks that struggle to emerge from the shell.
What is a good hatch rate for Marans eggs?
A good hatch rate for my Marans eggs is 72% and my average is closer to 65%. If you are getting anything better than 55% hatch rate for your Marans eggs then that is quite average.
One of the biggest breeders in Marans I know who hatches 1000's of eggs a year reckons that a 75% hatch rate is an excellent success!
Tips for hatching Marans eggs:
- Do not mix Marans eggs with those from other breeds.
- Only choose the best and cleanest eggs as it is very difficult to spot rotten ones in the incubator.
- Wait until day 10 or 11 to candle.
- Candle Marans eggs in a completely dark room.
- Try incubating dry to start with and test your hatch rates.
- Eggs should lose about 10-12% of their initial weight during incubation so weigh them before and during incubation.
- If you are really desperate try sanding the shell to remove the colour before incubation.
Before incubating:
If your eggs have come through the post or been shipped then place the eggs upright with the broad rounded end uppermost to allow them to come to room temperature after transport.
To further help the eggs to settle, rest your eggs for a few hours in a coolish place, not the fridge, then bring in to a warm room to gradually increase the heat. After they have rested for a minimum of 18 hours, but not more than 36 hours, as you want them to go into the incubator or under your broody as fresh as possible.
Hatching Marans eggs in the incubator:
If you are using an incubator it is best to have it running for two days before the eggs go in to allow the temperature to stabilise and to give you time to adjust the temperature. It is always best to try and have the incubator in a room where the temperature does not fluctuate too much, hot in the daytime sunshine and cool during the night.
With Marans eggs you should run the incubator dry for the first 14 days and monitor the egg weight loss.
Too much fluctuation in temperature during incubation and hatching will mean bigger losses. You can check if your incubator is functioning well with a properly calibrated thermometer, and don't forget to check it in different places as there may be cool or warm spots.
Follow the manufacturers instructions, presumably they have spent many hours testing their machines so they should know how best to run them, and if you have lost the instructions go to the manufactures website, where you should be able to download them.
Hens eggs should take 21 days to hatch, but this will vary on the size of the egg, smaller eggs take less time and larger ones, such as Marans can take 23 days. If you are unsure whether there is a live embryo or not give the egg the benefit of the doubt.
Don't forget the hatch may not all be exactly on the day you expect, especially if your incubator is a fraction of a degree under or over the correct temperature, or if it has been fluctuating throughout the hatch.
The chicks will start to "peep" in their shells before they begin to hatch, this is does not mean they are in distress. It is a good sign as it means they are calling to each other to synchronise the hatch, which if your incubator has cool or hot spots may mean that some of the chicks will have to attempt to hatch before they are fully formed.
Nature wants all the chicks to hatch within a day or so, as the mother hen would need to take the earliest hatchlings off to feed after a day or two, which means that any chicks which have not made it out of their shells will have to be abandoned to die, if not the earliest hatched will expire from starvation.
Candling Marans eggs:
The dark colour of Marans eggs makes them difficult to candle and you need to be careful as high power candling lamps often generate a lot of heat that can damage an embryo.
Use a proper candler with a cool light or the bright lamp on the back of a mobile phone. I candle in a completely dark room, otherwise it is impossible to see anything. If you can candle in the trays that is best, but if you have to pick the egg up handle it very gently and don't shake it about. Try not to candle too often as this can affect the eyesight of the chick and may even cause blindness.
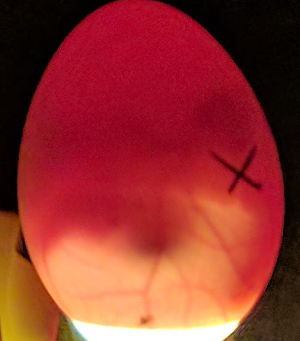
Below: Checking egg development by candling is difficult with Marans eggs.
After about 7 days of incubation you can candle the eggs, though 10 days is the generally recommended time for candling and you may not be able to see any development before 10 days. The embryos are at their most vulnerable in the first part of the cycle, and excessive candling at any stage can affect the eyes of the developing chick.
Hatching Marans Eggs:
Recently it seems that people hatching the dark Marans eggs prefer to run the incubator dry at least for the early part of the hatch, as it allows a decent size air pocket to form which helps with hatching. Some people then increase humidity during the actual hatch up to about 60% but others allow for both dry incubation and hatching. If you are unsure follow the manufacturers instructions for your particular machine.
When the eggs are put in the hatcher make sure that the surface the hatched chicks will stand on will not allow their feet to slip about, as if this happens at such an early stage it can affect their joints and make it difficult for them ever to stand up (called Splay Leg ) Sometimes a piece of old towelling on the hatcher floor is good, and if you think the humidity needs boosting it can be dampened with warm water when the eggs are put in the hatcher (or the turner stopped in the incubator).
Some Marans breeders recommend a humidity of around 60 during the actual hatching days, and also say to reduce the temperature by one or two degrees when hatching is due to start, but again follow your machines instruction manual if you are unsure.
Any hatched chicks can easily survive 24 hours and even 48 hours, without food or water as they will be living on the absorbed egg sac, but after this they need to be moved to a suitable brooder. If some of the eggs have still not hatched I give them a little more time, just in case.
The hatched chicks should be offered clean water in something they cannot fall in and get wet or even drown - a saucer with a few pebbles or bits of gravel in is fine, and of course ad lib chick crumbs, preferably put in something which makes a noise when pecked, such as a cardboard egg tray, as the noise encourages the chicks to peck at the food, something their mother would normally teach them.
After a few days they will also love fresh chickweed from the garden, or a little lettuce, and they should always have chick grit on offer or a little sprinkled on their chick crumbs -without grit they cannot digest food properly. If you want to tame them as pets make suitable clucking type noises when you offer them food, and they will soon get to know your voice.
If you are a novice I do hope the above may be of some use, and remember most beginners with little knowledge and no worries get wonderful hatches, and if you are more experienced and have any hints or tips about hatching I would love to hear from you, as I think one can never have too much knowledge. I find the older I get the more I realise how little I know about anything! And I wish you a very successful hatch and I hope you have as much pleasure as I have had from my Marans over the years.
Try to pay attention to cleanliness, and remember not to handle eggs when you have anything greasy or strong smelling on your hands including hand cream. Egg shells are permeable, and what is on the outside will affect the inside.
The chicks will start to "peep" in their shells before they begin to hatch, this is does not mean they are in distress. It is a good sign as it means they are calling to each other to synchronise the hatch, which if your incubator has cool or hot spots may mean that some of the chicks will have to attempt to hatch before they are fully formed.
Nature wants all the chicks to hatch within a day or so, as the mother hen will need to take the earliest hatchlings off to feed after a day or two, which means that any chicks which have not made it out of their shells will have to be abandoned to die, if not the earliest hatched will die from starvation.
When the eggs are put in the hatcher make sure that the surface the hatched chicks will stand on will not allow their feet to slip about, as if this happens at such an early stage it can affect their joints and make it difficult for them ever to stand up Sometimes a piece of old towelling on the hatcher floor is good, and if you think the humidity needs boosting it can be dampened with warm water when the eggs are put in the hatcher (or the turner stopped in the incubator).
Hatching Marans eggs with a broody hen:
Watching a broody care for her chicks is one of the pleasures in life.
The traditional method of hatching with a broody was to line the nest with an upturned sod of turf arranged so there is a dip in the middle to form a shallow hollow.
Hen eggs normally hatch after around 21 days, though the larger eggs sometimes take a little longer. And don't forget the "counting" starts 6 hours after the eggs are first put under. The hatch sometimes is completed with 24 hours, but can take 2-3 days.
If using a broody it is traditional to set an odd number of eggs, ie 7, 11, 13. I always like to introduce the eggs after dark. Just gently put the eggs up against her breast and she will soon tuck them in. Also make sure she can easily cover all her eggs, for if not, as she moves them around in the nest each egg will get chilled and warmed in turn, resulting in a completely lost clutch.
If when using a broody you find she rejects an egg after a few days, bow to her superior knowledge and take it away. If she is sitting very tight, after a couple of days you may have to take her off the nest so she can have something to eat and drink, and defecate.
If you put food and water by her she may not get off the nest at all and will "poo" on the eggs. The bacteria in the poo after 21 days at body temperature can result in the death of your chicks. When lifting her off do so gently, and make sure she is not holding any eggs under her wings. If there has been an "accident" and she has broken an egg or messed in the nest try cleaning the eggs gently with wire wool or very fine sandpaper rather than washing them, as once an egg has had its protective bloom washed off bacteria can gain access, and may result in dead embryos
Don't disturb the broody from day 18, if she wants to get off the nest she will but will probably sit tight. which is best for the chicks
It is best if you can have your broody sit somewhere quiet and undisturbed which will be convenient when the chicks have hatched, and it causes less problems if this is away from the usual nesting boxes, as the other hens may keep trying to lay in with her which causes squabbles and often results in broken eggs. Also your broody may try to acquire any eggs laid within reach and you end up with a hen sitting on a huge and unmanageable quantity of eggs of differing ages.
You could set up a broody coop in your hen run if it is large enough, or it can be somewhere else completely as long as it is fox proof. The first custom made broody coop I purchased was nicely situated on the lawn just outside my bedroom window and I was awoken around 2 am to find a fox had dug under and was pulling the broody out by her leg! A wire or wooden bottom to the coop solves this problem.
If you have to move your broody from the nesting boxes, first arrange the area you want her sit in. It is best to do the moving after dark. Have the new nest ready with a couple of the eggs she has been sitting on and which are already warm.
If she pecks you when you try to take the eggs from under her wear thick leather gardening gloves, and look away, rather than in her eye which hens find threatening and then they will often fly off squawking thereby damaging eggs.
After you have transferred a couple of eggs to her new nest, go quietly back and lift her off the nest, keeping her wings tight to her body to discourage fluttering which will stir her into action make her likely to jump straight off her new nest.
Place her quietly on the nest and cover the broody coop almost completely with an old blanket or something similar to almost exclude the light. Mostly you will find her on her new nest in the morning. If all looks well, that night remove the old eggs and gently put the eggs you want to hatch up against her breast and she should soon tuck them in. Also make sure she can easily cover all her eggs, for if not, as she moves them around in the nest each egg will get chilled and warmed in turn, resulting in a completely lost clutch. If, when using a broody you find she rejects an egg after a few days, bow to her superior knowledge and take it away. She knows it has stopped developing and doesn't want it to break and affect the other eggs.
Don't put her food and water within reach, but at the other end of the run if there is one attached. If she is sitting very tight and you think she isn't eating or drinking, after 2 or 3 days you may have to take her off the nest so she can have something to eat and drink, and defecate.
If you do need to lift her off the nest do so gently, and make sure she is not holding any eggs under her wings. If there has been an "accident" and she has broken an egg or messed in the nest try cleaning the eggs gently with wire wool or very fine sandpaper rather than washing them, as once an egg has had its protective bloom washed off bacteria can gain access, and may result in dead embryos. If you really must wash them make sure the water is slightly warmer than the eggs, as if it is cooler the pores in the egg will close drawing any bacteria inwards. And if you can get hold of any proper egg washing disinfectant so much the better.
Often, if I have taken a broody from the nest for food and exercise I throw her (obviously very lightly and gently) up into the air a little so she flutters down to land. The fluttering seems to encourage her to poo, and sitting hens do enormous and very smelly poos. She should then run around a bit, have something to eat and drink, perhaps a dust bath and then go back to the nest herself. By the way, do make sure your broody has no mites or lice before she begins to sit, as this can prove so distressing to the broody she may give up.
If you have moved her from her chosen nesting spot, and she has the freedom to return don't be surprised if she returns to that empty nest and sits on nothing at all rather than returning to your beautifully prepared spot complete with its rapidly cooling clutch of beautiful eggs. I knew an old farm worker who kept quite a few broodiest each year, and their coops were in a row. Each hen had a curtain ring round its leg and they were tied with string to the coop to prevent them from fighting with each other and make sure they went back to the correct nest. The eggs can survive quite a while without heat, but it is much better if they do not have to.