The incubation and hatching of Pekin bantam eggs.
Preparation is the key to success with incubation. You need to know your incubator and make sure it is set up and running properly for at least 24 hours before you set the eggs. With the right equipment and incubation practises, incubating and hatching chicken eggs is relatively easy and very rewarding. It takes about 21 days from setting to hatching.
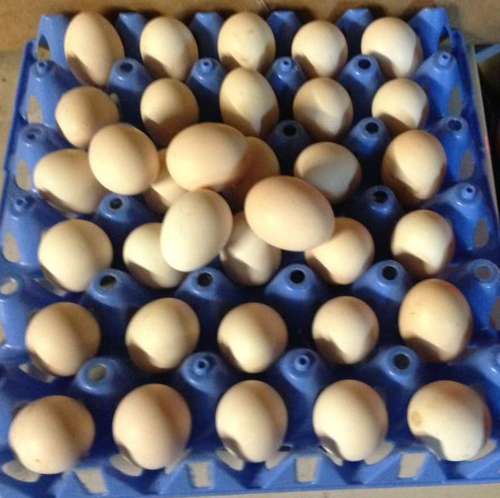
Below: Pekin bantam eggs.
How long do Pekin Bantam eggs take to hatch?
Pekin bantam eggs will take in and around 21 days to hatch. Sometimes they might start at 20 but it can be 22. I'm afraid they cannot be sexed when they hatch.
Do Pekin Bantam eggs hatch earlier?
Sometimes. An early hatch can mean your temperature is too high. In my experience Pekin Bantams tend to have slightly more spread out hatches, often lasting from day 19 to day 22.
What temperature do you incubate Pekin bantam eggs?
A forced air incubator should be set to 99.5°F and 60-65% relative humidity and a still air incubator should be set to 101°F with similar humidity levels. All incubator temperature will fluctuate a little so once it is set it is best left even if it looks half a degree warm or cold.
Below: An incubator with a temperature gauge and hydrometer.
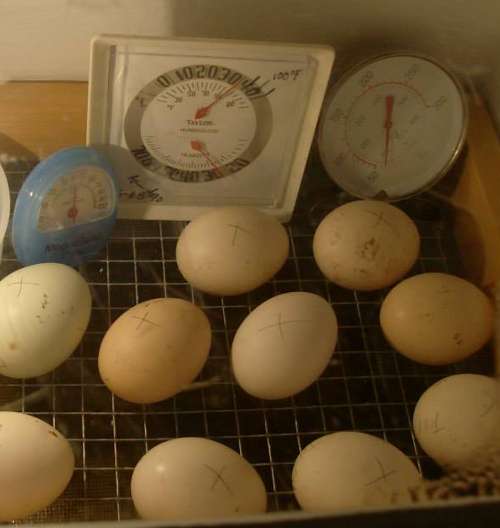
Stability is as important as accuracy.
What happens if the humidity is too high in the incubator?
If the humidity is too high in the incubator the egg will not lose enough moisture and the chick will be too big to hatch. An egg should lose 11 to 13 % of it's initial weight during incubation. In practice this is around 8 to 9 grams.
Expert tips for incubating chicken eggs:
Hatching eggs is an exact science and there some things you can do to help increase your hatch and survival rates.
- Clean equipment. I use a forced air incubator with both an electronic thermostat and a glass bulb thermometer to monitor temperature. More than 1°C variation in temperature will badly effect a hatch and more than 2 or 3°C probably means nothing will hatch at all.
- Accurate equipment. Quality thermometers are worth their weight in gold.
- Collect the eggs early in the morning and frequently during the day to prevent excessive chilling or heating of the eggs.
- Clean , well chosen eggs with no cracks and good colour from healthy parents on a good diet. I would add that it is not a good idea to use small eggs from a pullet that is just coming into lay as they may have no yolk and small chicks will take longer to mature and grow. Very large eggs are not a good idea unless you are sure of the older hens fertility and have candled the egg to make sure it has only a single yolk.
- Your eggs need to settle for at least 24 hours before setting, ideally next to your incubator. This allows the egg to reach ambient temperature. Eggs should always be stored with the pointy end down prior to incubation.
- Don't mix egg types, sizes and add eggs after incubation has started.
- Patience. A stable environment with the minimum of fluctuations in temperature and humidity is most likely to produce the best hatch rates.
- Make sure you leave the eggs and the incubator well alone during the first 10 days and resist the temptation to peek. The first 10 days is crucial and temperature fluctuations during this time are more likely to affect hatch rates.
- Eggs should be candled at day 10 and any clear eggs removed.
Choosing the correct eggs and treating them carefully:
Eggs need to be chosen with care and should represent the best standard to preserve the breed.
The eggs can be stored before setting and should be kept at a stable temperature and turned twice a day.
A cross in pencil is the best way to mark an egg. Eggs for hatching can be stored for up to 10 days but the success rate of the hatch will decline the older the eggs are.
It is more important that the temperate and humidity are stable for eggs in stage than the actual temperature they are stored at. The ideal temperature to store eggs is between 12 and 16°C with a humidity between 60 and 80%.
Humidity is far more difficult to control than temperature. Egg should also be turned back and forth rather than rolled continuously in the same direction. If you are not able to commit to turning the eggs by hand 3 to 5 times a day then i suggest you buy an incubator with an automatic egg turning mechanism
I add water at the correct temperature (38.1 °C) into the water tray to increase humidity for hatching. After temperature and hygiene, humidity is one of the biggest factors in hatch failure.
If the humidity is to high during the earlier stages of incubation the egg will not lose enough moisture and the chick will be to large to hatch successfully. If the humidity is to low the chick will be to dry to hatch easily.
Here in the UK I seldom have to add water to the first stage of incubation, only at day 19 to assist with the hatch and I have always had good hatch rates using this method.
A lot of big fully formed chicks dead in shell then to high a humidity is probably the cause, they will struggle to emerge from the egg and may end up with large bits of shell or membrane stuck to them. An egg needs to lose approximately 13% of its mass during the 21 days of incubation, this helps to form the air space in the egg and to provide enough room for the chick to manoeuvre inside the egg before hatching.
Foe more on the selection of eggs for incubation or storing fertile eggs waiting to be incubated.
Care of hatching eggs:
You should not wash eggs unless necessary, if it is then use a damp cloth with water warmer than the egg. Avoid cold water and do not soak the eggs in water.
Make sure eggs are dry before storing and never put damp or wet eggs in a carton for storage or shipping.
Select breed standard clean eggs for incubation.
Store the clean fertile eggs in an area which is kept at 55°- 60°F and 70-75% humidity. Avoid keeping eggs at temperatures above 75°F and at a humidity lower than 40%. Adverse conditions will ruin hatch rates.
Store hatching eggs pointed end down and turn the fertile eggs daily while they are being stored. Tilt at 30-45 degrees by putting a piece of 2" x 4" under one end of the carton and changing it to the other end daily works well.
The sooner you set the eggs the better, eggs stored for more than 10-14 days will see significant declines in hatch rates.
Before setting the eggs, allow them to come to room temperature for 6 hours (70-80°F) and candle to remove any cracked eggs.
Incubation of Pekin bantam eggs:
Four factors are of major importance in incubating eggs artificially: temperature, humidity, ventilation and turning.
Of these factors, temperature is the most critical. However, humidity tends to be overlooked and causes many hatching problems. Extensive research has shown that the optimum incubator temperature is 100°F when relative humidity is 60 percent. Concentrations of oxygen should be above 20 percent, carbon dioxide should be below 0.5 percent, and there needs to be air movement past the eggs.
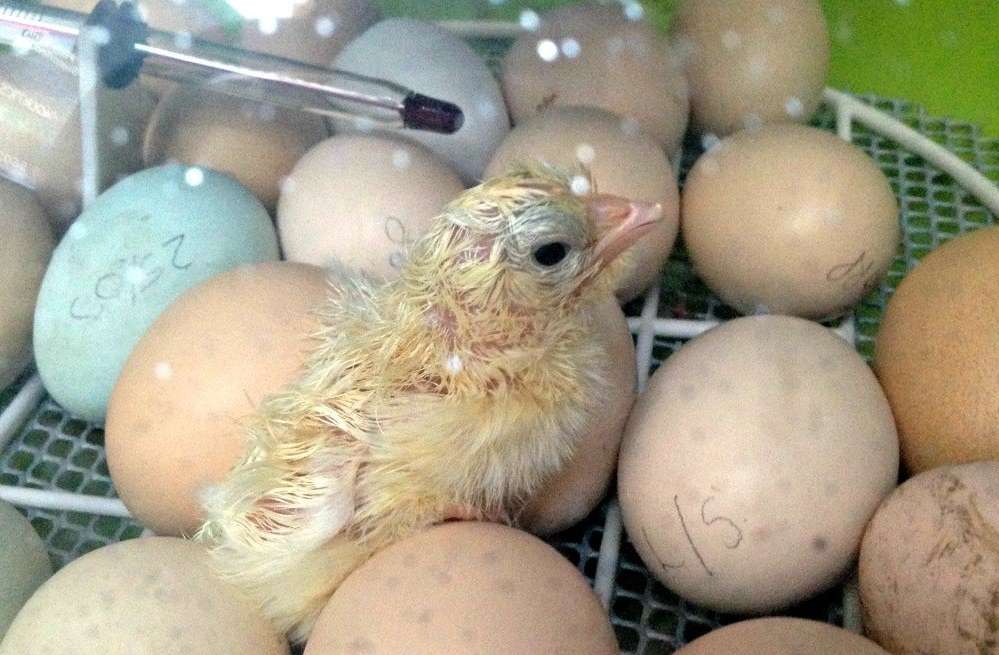
Below: A Pekin bantam chick just starting to pip.
There are two types of incubators commonly used, Forced-air incubators which have a built in fan to circulate the air and Still-air incubators which have no fans, so the air is allowed to stratify.
The forced-air incubator should be set at 99-99.5°F and 60-65% relative humidity (83-88°F wet bulb). The advantage of the forced-air incubator is that it is easier to maintain humidity at a constant level because of air circulation.
Still-air incubators are smaller and air flow is harder to manage. Set still-air incubators at 100 to 101°F at egg height. This is important since the air stratifies in these incubators. There can be as much as a 5° difference in temperature from the top to the bottom of some of the still-air incubators. Humidity should be 60-65% (80-90° wet bulb) during incubation and 70-75% (92-97° wet bulb) at hatching time. It is very easy to overheat the eggs in still-air incubators and difficult to maintain proper humidity.
During the warm-up period, the temperature should be adjusted to hold a constant 101°F for still air, 99°- 100°F for forced air. To obtain reliable readings, the bulb of the thermometer should be at the same height as the tops of the eggs and away from the source of heat. Using two thermometers is a good idea to ensure you are getting an accurate reading.
Incubator temperature should be maintained between 99° and 100°F. The acceptable range is 97° to 102°F. Mortality is seen if the temperature drops below 96°F or rises above 103°F for a number of hours.
Below: A pekin bantam chick that has just hatched.
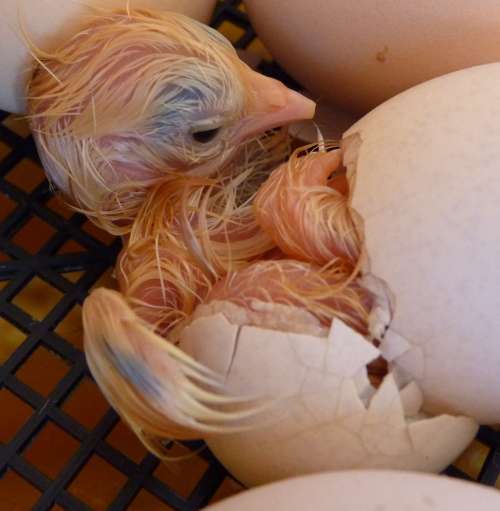
If the temperature stays at either extreme for several days, the eggs may not hatch. Overheating is more critical than under heating. Running the incubator at 105°F for 15 minutes will seriously affect the embryos, while running it at 95° for 3 or 4 hours will only slow the chick's metabolic rate.
By the time you have got your eggs ready for setting your incubator should have been running at least 24 hours. This gives you time to learn what's going to happen in your incubator and allows you to make any necessary adjustments before setting your eggs.
A definite way to ruin hatching eggs is to put them in the incubator without having it properly adjusted. If the eggs reach an internal temperature of 105 degrees you can kiss them good-bye.
Don't confuse internal egg temperature with internal incubator temperature. The temperature in an incubator changes constantly, rising and lowering. The temperature inside the egg will be an average of this temperature swing in your incubator.
During the period of incubation your eggs will need to be turned until day 17 for chicken eggs. There are three main ways this is done, manually, semi-automatic, or fully automatic.
With the manual method you will simply turn the eggs by hand through 180 degrees at least three times a day. With the semi-automatic turning you can turn all of your eggs at once often by a lever outside the incubator. The fully automatic system uses a drive system to turn the eggs on a time-based system.
The key part about turning is for it to be at least twice a day but ideally a lot more and to be consistent. Incubate the eggs either on their end (small end down) or on there sides.
Is you Thermometer accurate? Keeping the temperature accurate can be a struggle, even with very good thermometers. I've thrown away many thermometers in past years that I had considered reliable.
A nice part about running a modern electronic incubator is that you get a very accurate temperature control often with digital displays. After the first hatch, you can raise or lower the temperature by what the hatch tells you. If they hatched early the temperature needs to be lowered. If they hatch late the temperature needs to be raised.
You can check your Thermometer this way. Keep notes on everything you do during the incubation period. As you learn you'll have these notes to look back on. They will be the most valuable tools that you can have. It won't be long until you can say, "I know what happened, all I need to do is change this one little thing". Soon you will be able to make adjustments by knowing what to do, instead of guessing!!!
Humidity is checked by way of a hygrometer or electronic handheld unit. Most are inaccuarte to some extent and they become more inaccurate the higher or lowel the level being measured.
Getting your humidity to become as accurate as your temperature is nearly impossible. It is almost completely impossible with a small incubator and you should aim for a stable humidity rather than a fluctuating one.
Try to get your humidity as close as you can, and you'll be fine. Just being aware that humidity is important, and trying to get the numbers to come in close will be a huge help to your hatch. If you can hold within 10-15% things should turn out fine.
As seasons change, so does humidity. When you are incubating eggs in January and February it will be very difficult to maintain a humidity that is as high as you like. That's because the outside humidity is so low.
By the same token, when you are incubating in June and July the outside humidity is usually much greater and the humidity in your incubator will most likely get much higher. Hatching problems will change as the season progresses. If you are doing things the same way in July as you were in January, you have to expect different results.
If your temperature is not accurate you will definitely have problems at hatch time. The bigger the deviation from the proper temperature, the bigger your problems will be!
Surface area is "the amount of surface of water exposed to air in your incubator". The depth of water has absolutely no bearing on the humidity in the incubator, unless the depth is zero.
If the humidity is too low in your incubator then increase the surface area of the water. Place another pan of water in the incubator, or some small, wet sponges.
To decrease the humidity, remove surface area.
An incubator should be operated in a location free from drafts and direct sunlight.
Do not adjust the heat upward during the first 48 hours after eggs are set as this practice cooks many eggs. Eggs will take time to warm to incubator temperature and many times in small incubators the incubator temperature will drop below 98°F for the first 6-8 hours or until the egg warms to 99°-100°F.
Ventilation: The best hatching results are obtained with normal atmospheric air, which usually contains 20-21 percent oxygen. It is difficult to provide too much oxygen, but a deficiency is possible. Make sure that the ventilation holes are adjusted to allow a normal exchange of air. This is critical on home-made incubators. It is possible to suffocate the eggs and chicks in an air-tight container. However, excessive ventilation removes humidity and makes it difficult to heat incubators properly.
Turning: Eggs set on their sides must be rotated 1/2 turn at least 3 times daily. Eggs set with the air cell end up should be tilted in the opposite direction 3 times daily. This keeps the embryo centred in the egg and prevents it from sticking to the shell membrane. If hand turning, to insure proper turning, mark each side of the egg with a pencil. Put an "x" on one side and an "o" on the opposite side.
Mine all have automatic egg rollers which can be put on a timer so it turns itself off on the correct day. Hygiene is essential, clean eggs with no cracks to allow bacteria inside the egg and a clean incubator will improve hatch and survivability rates.
Stop turning the eggs for the last three (3) days of the incubation cycle (at 18 days for chickens, 25 days for waterfowl, etc.) and do not open the incubator until the hatch is completed to insure that a desirable hatching humidity is maintained.
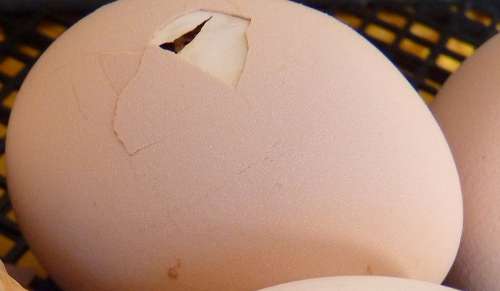
Hatch Time: The hatching process starts about day 19 when the chicks break through the internal membrane into the airspace inside the shell. It is at this point you can hear the chick peeping inside the shell if you listen carefully. Within a few hours a small triangular hole will appear, generally in the upper part of the shell. This is made by a small tooth on the upper end point of the chicks beak and is so the chick can breathe properly. This is called pipping.
When the hatching itself begins the blood begins to withdraw from the membrane inside the shell and the chick gradually begins to force its way out of the shell by enlarging the pipping hole into a crack.With a few final pushes it will break the shell in half and flop out. The chicks are unable to stand properly to start of with and seem to drift in and out of sleep for a few hours. They will dry out and brighten up quite quickly and become very active in about 8 hours.
Do not help the chicks from the shell at hatching time. If it doesn't hatch, there is usually a good reason. Also, prematurely helping the chick hatch could cripple or infect the chick. Humidity is critical at hatching time. Don't allow your curiosity to damage your hatch.
As soon as the chicks are dry and fluffy or 6 to 12 hours after hatching, remove the chicks from the incubator. It is good practice to remove all the chicks at once and destroy any late hatching eggs. Hatching time can be hereditary and you can control the uniformity of hatching by culling late hatchers. If you keep every chick which hatches late, in a few years each hatch could last 4 days or longer.
Immediately after each hatch, thoroughly clean and disinfect all hatching trays, water pans and the floor of the hatcher. Scrape off all egg shells and adhering dirt. Wipe clean surfaces thoroughly with a cloth dampened in Quaternary ammonium, chlorox or other disinfectant solution.
They question of weather or not to help at a hatch is a very difficult one. As a rule I tend not to help at a hatch. If the chick was not ready and you try to remove the shell, it may bleed to death or you may damage the chick.
By opening the incubator you risk lowering humidity levels drastically and shrink wrapping the chicks in the membranes.
If the chick is struggling you can give some gentle assistance, gently move the shell to add some pressure to the two halves to see if they give easily to release the chick. If a blood spot appears then leave well alone.
It is quite common for some membrane to stick to the chick and this can prevent it hatching properly or weaken it considerably. Moisten the spot where the membrane has stuck with a cotton bud and some warm water, leave for a few seconds and then use the cotton bud to loosen the membrane.
Looking after Pekin chicks:
They should be left in the incubator until they are dry and fluffy.
Pekin chicks should be kept in until it has dried.
More Pekin die as a result of dampness than any other cause. The chicks are handicapped in the direction through possessing to much foot feathering. Once the foot feathering gets wet, it takes a considerable amount of time for it to dry.
Pekin chicks are hardy and will thrive on ordinary chick feed from the earliest stages. Avoid feeding mash during the growing period since it very often results in sour crop.
The chicks receive as much as they can eat. When feed is made available from the beginning it will be found that the chicks eat a little at a time, whereas hungry chicks overload their crops.
Finely cut spinach fed two or three times weekly until they are weaned onto growers ration.
Looking after Pekin chicks is otherwise the same as any breed of chickens.